📄
목차
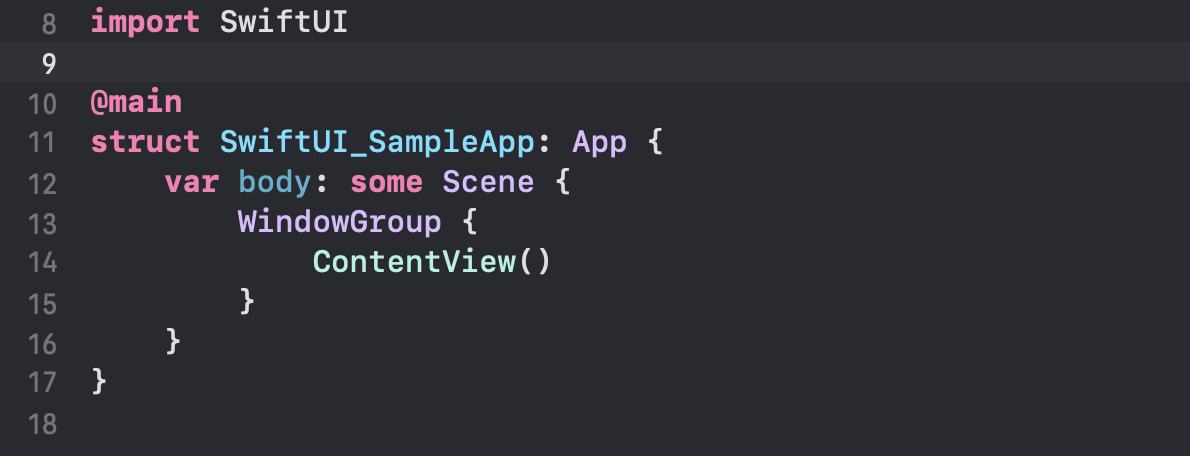
<프로젝트이름>App.swift

- APNs 나 외부 SDK를 사용할 때에 AppDelegate와 SceneDelegate가 필요할 때가 있다. 그러나 SwiftUI 프로젝트를 만들면 해당 파일들이 아니라 <프로젝트이름>App.swift만 덩그러니 있는 것을 발견할 수 있다.
- iOS 14부터는 App 프로토콜을 통해 기본 Scene을 구축한다. 여기서 AppDelegate와 SceneDelegate의 흉내를 낼 수 있다.
didFinishLaunchingWithOptions
- firebase 초기화나 oAuth 로그인 초기화 등 앱 실행시에 최초 1회 실행이 필요한 로직들을 AppDelegate의 didFinishLaunchingWithOptions에서 실행했었다.
- 해당 로직들은 init()을 통해 구현할 수 있다.
@main
struct <프로젝트이름>App: App {
	init () {
		// didFinishLaunchingWithOption의 로직
	}

	var body: some Scene {
		WindowGroup {
	    ContentView()
		}
  }
}
SceneDelegate
- SceneDelegate의 작업은 WindowGroup에 해당 메소드들을 추가하여 구현할 수 있다.
@main
struct <프로젝트이름>App: App {
	@Environment(\.scenePhase) var scenePhase

	var body: some Scene {
		WindowGroup {
	    ContentView()
				.onChange(of: scenePhase) { phase in    // 화면 phase
					switch phase {
					case .active:
						print("켜짐")
					case .inactive:
						print("꺼짐")
					case .background:
						print("백그라운드에서 동작")
					}
				}
				.onOpenURL { url in       // 딥링크
					print("URL: \(url)"
				}
				.onContinueUserActivity("<이름>") { userActivity in     // 푸시 등으로 앱으로 진입할 때에
					if let things = userActivity.userInfo["something"] as? String {
						print("get \(things)")
					}
				}
		}
  }
}
AppDelegate와 SceneDelegate 사용하기
- AppDelegate와 SceneDelegate를 사용해야 할 때에는
@UIApplicationDelegateAdaptor프로퍼티래퍼를 통해 사용할 수 있다.
- NSObject를 상속받은 AppDelegate 클래스를 하나 만든다.
ObservableObject로 만들면 SwiftUI는 자동으로 AppDelegate를EnvironmentObject로 바인딩한다.
// AppDelegate 생성
class MyAppDelegate: NSObject, UIApplicationDelegate, ObservableObject {
    func application(
        _ application: UIApplication,
        didRegisterForRemoteNotificationsWithDeviceToken deviceToken: Data
    ) {
        // Record the device token.
    }
}- 그 후에 해당 클래스를 App 에서
@UIApplicationDelegateAdaptor로 선언하면 된다.
@main
struct MyApp: App {
    @UIApplicationDelegateAdaptor private var appDelegate: MyAppDelegate

    var body: some Scene { ... }
}
- iOS13 부터 생긴 SceneDelegate는 애초에 AppDelegate에서 UI LifeCycle과 관련된 부분들만 분리되어 담당했다. SwiftUI에서 사용하려면, App으로 직접적으로 가져오는 것이 아니라 AppDelegate에 다시 연결하여 사용한다.
// SceneDelegate 생성
class MySceneDelegate: NSObject, UIWindowSceneDelegate, ObservableObject {
    ...
}
// AppDelegate에 연결
extension MyAppDelegate {
func application(
_ application: UIApplication,
configurationForConnecting connectingSceneSession: UISceneSession,
options: UIScene.ConnectionOptions
) -> UISceneConfiguration {
let configuration = UISceneConfiguration(
name: nil,
sessionRole: connectingSceneSession.role)
if connectingSceneSession.role == .windowApplication {
configuration.delegateClass = MySceneDelegate.self
}
return configuration
}
}
Reference
UIApplicationDelegateAdaptor | Apple Developer Documentation
A property wrapper type that you use to create a UIKit app delegate.

Swift: SwiftUI 프로젝트에 AppDelegate, SceneDelegate 만들기
AppDelegate와 SceneDelegate 만드는 법, 그리고 그 두 파일 없이도 대응하는 법을 알아보자
 https://medium.com/hcleedev/swift-swiftui-프로젝트에-appdelegate-scenedelegate-만들기-4fa2d85191e
Uploaded by N2T
